1. 产品简介
这是一款支持彩色显示的3.5英寸电容触摸屏,仅手掌大小,分辨率480×320,是开发显示类项目的理想选择。
采用高质量IPS屏与光学贴合工艺,带来178°广视角和清晰的显示效果。
支持5点灵敏电容触控。IPS技术确保从任意角度观看,色彩均真实饱满,减少反光眩光;光学贴合则使屏幕不易进灰,显示更清晰,品质更可靠。
提供两种灵活的硬件连接方式,简化接线步骤。
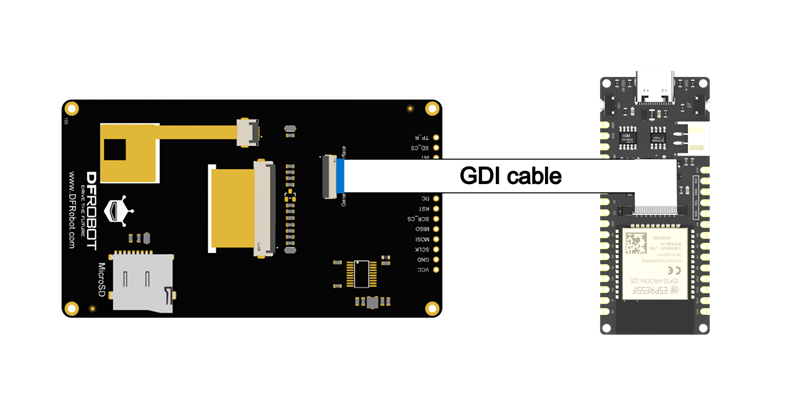
除了通用的SPI排针接口,更提供GDI接口(兼容Firebeetle 2 ESP32系列),使用一根FPC排线即可即插即用。
专为多种显示应用场景设计,助力项目快速落地。
屏幕具备显示明亮、视角广阔、接线简便、坚固耐用等特点,适用于物联网控制面板、桌面天气信息屏、便携游戏机及各类触摸交互界面。
此外,屏幕板载了Micro SD卡槽,无需额外扩展。还兼容Arduino GDL库并提供丰富示例,从绘制基础图形到创建进度条、按钮、数字键盘等复杂UI控件,都能轻松实现,极大加速开发进程。
2. 产品特性
- 480×320高清分辨率,画面细腻逼真
- 3.5英寸紧凑尺寸,仅如手掌般大小
- 178°全视角IPS硬屏,色彩真实饱满
- 5点电容触控,响应灵敏,操作顺滑
- 光学全贴合工艺,透光更佳,不易进灰
- GDI一线连接,即插即用,简化接线
- 双接口兼容,支持SPI与GDI,连接灵活
- 板载Micro SD卡槽,轻松扩展存储空间
3. 应用场景
- 便携式传感器数据仪表盘
- 桌面天气信息屏
- 硬件状态监控屏
- 可编程多功能计算器
- 复古游戏机交互界面
- 物联网家居控制中控台
4. 技术规格
基本参数
- 工作电压: DC 3.3V ~ 5V
- 工作电流: 80mA@5V
- 通信接口: SPI / GDI
屏幕参数 - 屏幕尺寸: 3.5英寸
- 分辨率: 480 × 320 (HVGA)
- 面板类型: IPS
- 可视角度: 178° (全视角)
- 亮度: 300 cd/m²
- 对比度: 800:1
- 表面处理: 防指纹(AF)涂层
- 生产工艺: 光学全贴合
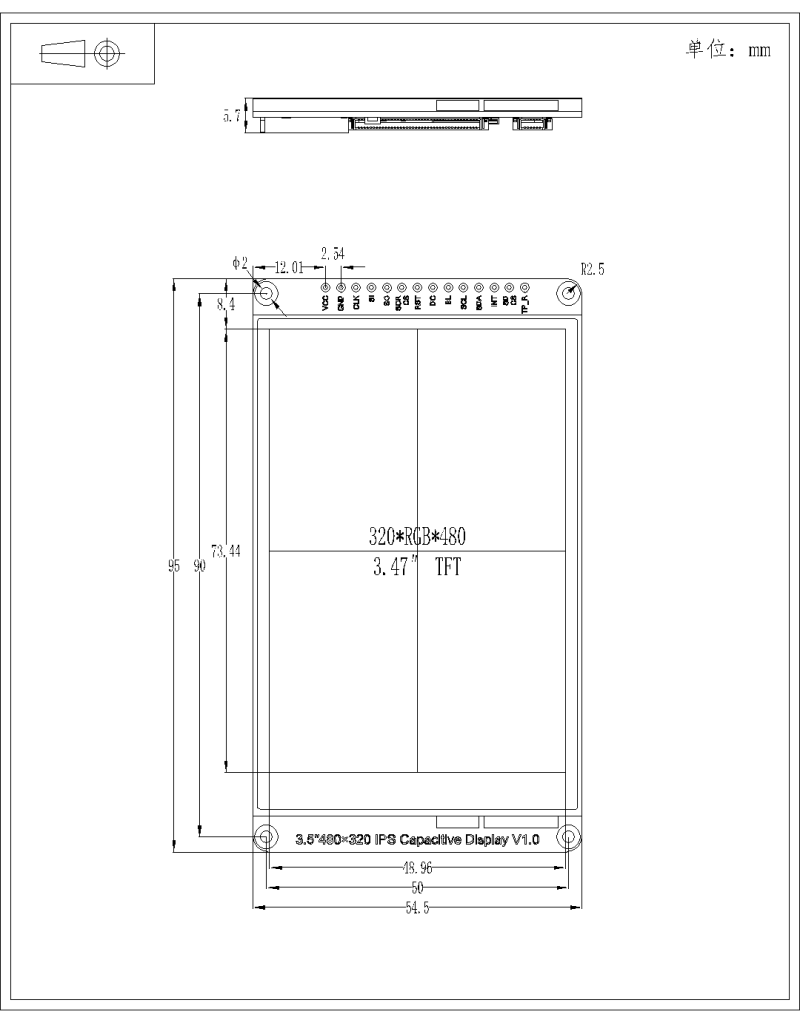
- 有效显示区域: 48.96 × 73.94 mm
触控特性 - 触控类型: 电容式
- 触控点数: 5点
- 触控接口: SPI/GDI
机械结构 - 外形尺寸: 95.0 × 54.5 × 5.7 mm
- 安装孔直径: 2.0 mm
- 安装孔间距:90 × 50mm
- 重量:62.6g(带包装)
扩展功能 - 存储扩展: 板载Micro SD卡槽
软件支持 - 兼容Arduino GDL库
5. 接口说明
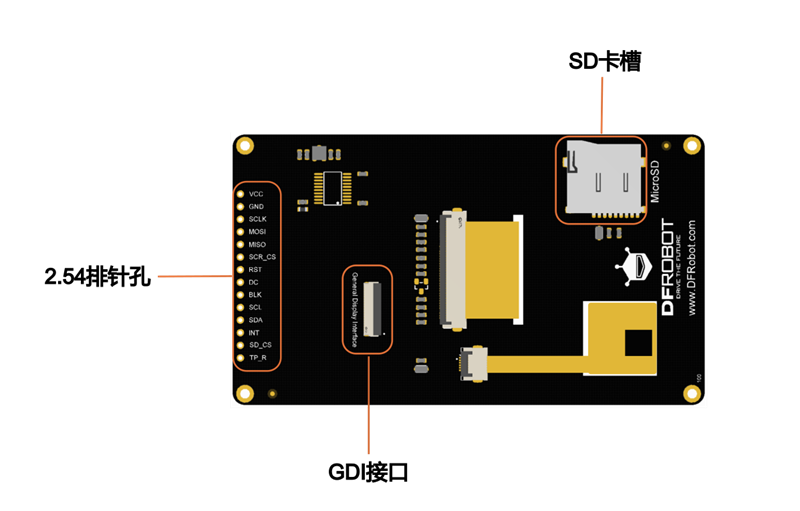
排针接口说明
| 标号 | 名称 | 功能描述 |
|---|---|---|
| 1 | VCC | 电源正极 |
| 2 | GND | 电源负极 |
| 3 | SCLK | 时钟 |
| 4 | MOSI | 数据(主机发送从机接收) |
| 5 | MISO | 数据(主机接收从机发送 |
| 6 | SCR_CS | 屏幕片选 |
| 7 | RST | 复位 |
| 8 | DC | 数据/命令 |
| 9 | BLK | 背光。背光设定了默认值,用户不用连接背光引脚也可点亮;此外,连接背光引脚,输入高电平(1)是将背光亮度调到最大,输入低电平(0)是关闭背光 |
| 10 | SCL | 触摸时钟 |
| 11 | SDA | 触摸数据 |
| 12 | INT | 触摸中断 |
| 13 | SD_CS | SD卡片选 |
| 14 | TP_R | 触摸复位 |
GDI接口说明
此接口为DFRobot专用GDI显示屏接口,使用18pin-FPC线连接屏幕,连接屏幕更加便捷。
使用FPC线连接屏幕时,根据GDL demo配置所需对应的引脚号即可。
引脚映射如下:
| FPC PINS | Description |
|---|---|
| VCC | 3V3 |
| LCD_BL | 背光 |
| GND | GND |
| SCLK | SPI时钟 |
| MOSI | 主机输出,从机输入 |
| MISO | 主机输入,从机输出 |
| LCD_DC | 数据/命令 |
| LCD_RST | 复位 |
| LCD_CS | TDT片选 |
| SD_CS | SD卡片选 |
| FCS | 字库片选 |
| TCS | 触摸片选 |
| SCL | I2C时钟 |
| SDA | I2C数据 |
| INT | INT |
| BUSY | 防撕裂引脚 |
| X1 | 自定义引脚1 |
| X2 | 自定义引脚2 |
6. 产品尺寸图
7. Arudino使用教程
7.1 使用前请注意
- GDI接口的使用需要与具有GDI接口的主控相匹配
- 建议使用Arduino1.8.10及以上版本
- SD卡插槽接触不良,有可能会初始化失败,插拔后成功
7.2 硬件准备
- Firebeetle 2 ESP32-E 开发板(SKU:DFR0654)×1
- 3.5"480×320 IPS电容触摸屏(SKU:DFR1092)×1
- 18pin-FPC连接线 ×1
- 若干杜邦线
7.3 软件准备
- 下载Arduino IDE, 点击下载Arduino IDE
- 下载Arduino库: 点击下载DFRobot_GDL库文件
- 点击链接查看:如何安装库文件?
7.4 硬件连接
GDI排线连接方式
2.54排针连接方式
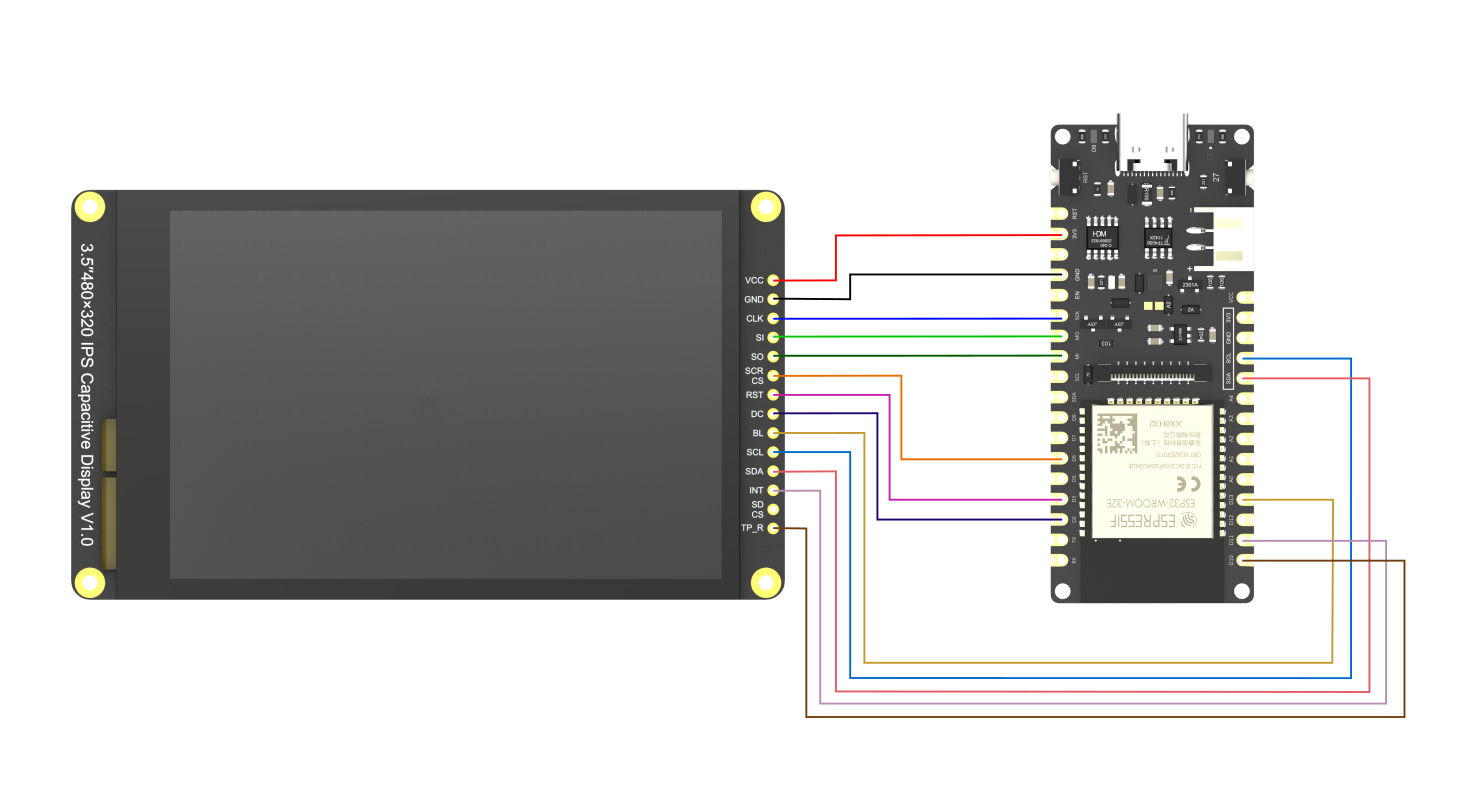
- 显示屏 VCC ----连接----主控 3V3
- 显示屏 GND ----连接----主控 GND
- 显示屏 CLK ----连接----主控 SCK
- 显示屏 SI ----连接----主控 MO
- 显示屏 SO ----连接----主控 MI
- 显示屏 SCR_CS ----连接----主控 D6
- 显示屏 RST ----连接----主控 D3
- 显示屏 DC ----连接----主控 D2
- 显示屏 BL ----连接----主控 D13
- 显示屏 SCL----连接----主控 SCL
- 显示屏 SDA ----连接----主控 SDA
- 显示屏 INT ----连接----主控 D11
- 显示屏 SD_CS ----不使用该功能
- 显示屏 TP_R ----连接----主控 D10
7.5 应用样例
注意:
- 本产品的演示demo全部存放于DFRobot_GDL->example->basic文件里
- 烧录Demo之前,请打开对应的实体化函数(DFRobot_ST7365P_320x480_HW_SPI)
7.5.1 样例代码1-basicTest
**程序说明:**这是一个基础显示示例,包括画点、线、圆、矩形等。
#include "DFRobot_GDL.h"
/*ESP32 and ESP8266*/
#if defined(ESP32) || defined(ESP8266)
#define TFT_DC  D2
#define TFT_CS  D6
#define TFT_RST D3
#define TFT_BL  D13
#define TFT_SD  D7
#endif

DFRobot_ST7365P_320x480_HW_SPI screen(/*dc=*/TFT_DC,/*cs=*/TFT_CS,/*rst=*/TFT_RST,/*bl=*/TFT_BL);

void setup() {
  Serial.begin(115200);
  screen.begin();
}

void loop(){
    testDrawPixel();
    testLine();
    testFastLines(COLOR_RGB565_PURPLE,COLOR_RGB565_YELLOW);
    testRects(COLOR_RGB565_BLACK,COLOR_RGB565_WHITE);
    testRoundRects();
    testCircles(24,COLOR_RGB565_BLUE);
    testTriangles(COLOR_RGB565_YELLOW);
    testPrint();

}

/* Test to draw a pixel*/
void testDrawPixel() {
  //Clear screen
  screen.fillScreen(COLOR_RGB565_BLACK);
  int x = 0;
  int y = screen.height();
  for(int i = 0; i <= screen.width()/2; i += 10){
    for (x = screen.width() - i; x >= i; x-=10 ){
      /*
       * @ brief draw a pixel
       * @ param x coordinate
       *         y coordinate
       * c pixel color
       */
      screen.drawPixel(x, y, COLOR_RGB565_ORANGE);
      delay(10);
    }

    for (y = screen.height() - i; y >= i; y-=10){
      screen.drawPixel(x, y, COLOR_RGB565_ORANGE);
      delay(10);
    }

    for (x = i; x <= screen.width() - i + 1; x+=10 ){
      screen.drawPixel(x, y, COLOR_RGB565_ORANGE);
      delay(10);
    }

    for (y = i; y <= screen.height() - i + 1; y+=10){
      screen.drawPixel(x, y, COLOR_RGB565_ORANGE);
      delay(10);
    }
  }
}

/* Test to draw a line*/
void testLine(){
// 0x00FF is the color data in the format of RGB565
  uint16_t color = 0x00FF;
  screen.fillScreen(COLOR_RGB565_BLACK);
  for (int16_t x=0; x < screen.width(); x+=6) {
    /*
     * @ brief draw a line
     * @ param x0 The x-coordinate of the first vertex
     *         y0 The y-coordinate of the first vertex
     *         x1 The x-coordinate of the second vertex
     *         y1 The y-coordinate of the second vertex
     *         c line color
     */
    screen.drawLine(/*x0=*/screen.width()/*Screen width*//2, /*y0=*/screen.height()/*Screen height*//2, /*x1=*/x, /*y1=*/0, /*c=*/color+=0x0700);
  }
  for (int16_t y=0; y < screen.height(); y+=6) {
    screen.drawLine(screen.width()/2, screen.height()/2, screen.width(), y, color+=0x0700);
  }

  for (int16_t x = screen.width(); x >= 0; x-=6) {
    screen.drawLine(screen.width()/2, screen.height()/2, x,screen.height(), color+=0x0700);
  }

  for (int16_t y = screen.height(); y >= 0; y-=6) {
    screen.drawLine(screen.width()/2, screen.height()/2, 0, y, color+=0x0700);
  }
}

/* Test to fast draw line(need to set delay), only horizontal line and vertical line */
void testFastLines(uint16_t color1, uint16_t color2) {
  for (int16_t y=0; y < screen.height(); y+=4) {
    /*
     * @ brief draw a line
     * @ param x The x-coordinate of the first vertex
     *         y The y-coordinate of the first vertex
     *         w Length of line segment
     *         c line color
     */
    screen.drawFastHLine(/*x=*/0, /*y=*/y, /*w=*/screen.width(),/*c=*/color2);
    delay(10);
  }

  for(int16_t x=0; x < screen.width(); x+=3) {
    /*
     * @ brief draw a line
     * @ param x The x-coordinate of the first vertex
     *         y The y-coordinate of the first vertex
     *         h length of line segment
     *         c line color
     */
    screen.drawFastVLine(/*x=*/x, /*y=*/0, /*h=*/screen.height(), /*c=*/color1);
    delay(10);
  }
}

/* Test to draw a rectangle*/
void testRects(uint16_t color1, uint16_t color2) {
    screen.fillScreen(COLOR_RGB565_BLACK);
    int16_t x=screen.width()-12;
    for (; x > 100; x-=screen.width()/40) {
      /*
       * @ brief draw a hollow rectangle
       * @ param x The x-coordinate of the vertex
       * @ param y The y-coordinate of the vertex
       * @ param w horizontal side length
       * @ param h longitudinal side length
       * @ param color Fill color, RGB color with 565 structure
       */
      screen.drawRect(/*x=*/screen.width()/2 -x/2, /*y=*/screen.height()/2 -x/2 , /*w=*/x, /*h=*/x, /*color=*/color2+=0x0F00);
      delay(100);
    }

    /*
     * @ brief draw a filled rectangle
     * @ param x The x-coordinate of the vertex
     * @ param y The y-coordinate of the vertex
     * @ param w horizontal side length
     * @ param h longitudinal side length
     * @ param color Fill color, RGB color with 565 structure
     */
    screen.fillRect(/*x=*/screen.width()/2 -x/2, /*y=*/screen.height()/2 -x/2 , /*w=*/x, /*h=*/x, /*color=*/color2);
    delay(100);
    for(; x > 6; x-=screen.width()/40){
      screen.drawRect(screen.width()/2 -x/2, screen.height()/2 -x/2 , x, x, color1);
      delay(100);
    }
}

/* Test to draw a rounded rectangle */
void testRoundRects() {
  screen.fillScreen(COLOR_RGB565_BLACK);
// 0xF00F is the color data in the format of RGB565
  int color = 0xF00F;
  int i;
  int x = 0;
  int y = 0;
  int w = screen.width()-3;
  int h = screen.height()-3;
  for(i = 0 ; i <= 16; i+=2) {
    /*
     * @ brief Draw a hollow rounded rectangle
     * @ param x0 The x-coordinate of the start vertex
     * @ param y0 The y-coordinate of the start vertex
     * @ param w horizontal side length
     * @ param h longitudinal side length
     * @ param radius Round corner radius
     * @ param color border color, 565 structure RGB color
     */
    screen.drawRoundRect(/*x0=*/x, /*y0=*/y, /*w=*/w, /*h=*/h, /*radius=*/20, /*color=*/color);
    x+=5;
    y+=5;
    w-=10;
    h-=10;
    color+=0x0100;
    delay(50);
  }
  for(i = 0 ; i <= 16; i+=2) {
    /*
     * @ brief Draw a filled and rounded rectangle
     * @ param x0 The x-coordinate of the start vertex
     * @ param y0 The y-coordinate of the start vertex
     * @ param w horizontal side length
     * @ param h longitudinal side length
     * @ param radius Round corner radius
     * @ param color Fill color, RGB color with 565 structure
     */
    screen.fillRoundRect(/*x0=*/x, /*y0=*/y, /*w=*/w, /*h=*/h, /*radius=*/10, /*color=*/color);
    x+=5;
    y+=5;
    w-=10;
    h-=10;
    color+=0x0500;
    delay(50);
  }
}

/* Test to draw a circle */
void testCircles(uint8_t radius, uint16_t color) {
  screen.fillScreen(COLOR_RGB565_BLACK);
  for (int16_t x=radius; x <=screen.width()-radius; x+=radius*2) {
    for (int16_t y=radius; y <=screen.height()-radius; y+=radius*2) {
      /*
       * @ brief Draw a hollow circle
       * @ param x0 The x-coordinate of the center point
       * @ param y0 The y-coordinate of the center point
       * @ param r radius
       * @ param color Circle color, RGB color with 565 structure
       */
      screen.drawCircle(/*x0=*/x, /*y0=*/y, /*r=*/radius, /*color=*/color);
        if(x == y ||x == -y ||x == y + 2*radius)
          /*
           * @ brief Draw a filled circle
           * @ param x0 The x-coordinate of the center point
           * @ param y0 The y-coordinate of the center point
           * @ param r radius
           * @ param color Fill color, RGB color with 565 structure
           */
          screen.fillCircle(/*x0=*/x, /*y0=*/y, /*r=*/radius, /*color=*/color);
       color += 800;
       delay(100);
    }
  }
}

/* Test to draw a triangle */
void testTriangles(uint16_t color){
  screen.fillScreen(COLOR_RGB565_BLACK);

  for (int16_t i=0; i <=screen.width(); i+=24)
    /*
     * @ brief Draw a hollow triangle
     * @ param x0 The x-coordinate of the start vertex
     * @ param y0 The y-coordinate of the start vertex
     * @ param x1 The x-coordinate of the second vertex
     * @ param y1 The y-coordinate of the second vertex
     * @ param x2 The x-coordinate of the third vertex
     * @ param y2 The y-coordinate of the third vertex
     * @ param color border color, 565 structure RGB color
     */
    screen.drawTriangle(/*x0=*/i,/*y0=*/0,/*x1=*/0,/*y1=*/screen.height()-i,/*x2=*/screen.width()-i,/*y2=*/screen.height(), /*color=*/color);

  for (int16_t i=0; i <screen.width(); i+=24)
    screen.drawTriangle(screen.width(),i*4/3,0,screen.height()-i*4/3,i,0, color);

  for (int16_t i=0; i <screen.width(); i+=24)
    screen.drawTriangle(screen.width(),i*4/3,i,0,screen.width()-i,screen.height(), color);

  color = COLOR_RGB565_RED;
  for (int16_t i=0; i <=screen.width(); i+=24)
     /*
      * @ brief Draw a filled triangle
      * @ param x0 The x-coordinate of the start vertex
      * @ param y0 The y-coordinate of the start vertex
      * @ param x1 The x-coordinate of the second vertex
      * @ param y1 The y-coordinate of the second vertex
      * @ param x2 The x-coordinate of the third vertex
      * @ param y2 The y-coordinate of the third vertex
      * @ param color Fill color, RGB color with 565 structure
      */
    screen.fillTriangle(/*x0=*/i,/*y0=*/0,/*x1=*/0,/*y1=*/screen.height()-i,/*x2=*/screen.width()-i,/*y2=*/screen.height(), /*color=*/color+=100);

  for (int16_t i=0; i <screen.width(); i+=24)
    screen.fillTriangle(screen.width(),i*4/3,0,screen.height()-i*4/3,i,0, color+=100);

  for (int16_t i=0; i <screen.width(); i+=24)
    screen.fillTriangle(screen.width(),i*4/3,i,0,screen.width()-i,screen.height(), color+=100);
}

void testPrint() {
  // 0x00FF is the color data in the format of RGB565
  int16_t color = 0x00FF;
   // Set text wrapping mode
   // true = Text word wrap, false = No word wrap
  screen.setTextWrap(false);
  //Fill color, RGB color with 565 structure
  screen.fillScreen(COLOR_RGB565_BLACK);

  //Set the coordinate position x = 0, y = 50
  screen.setCursor(0, 50);
  //Set the text color; this is a changeable value
  screen.setTextColor(color+=0x3000);
  //Set text size to 0
  screen.setTextSize(0);
  //Output text
  screen.println("Hello World!");

  screen.setTextColor(color+=0x3000);
  //Set text size to 1
  screen.setTextSize(1);
  screen.println("Hello World!");

  screen.setTextColor(color+=0x3000);
  //Set text size to 2
  screen.setTextSize(2);
  screen.println("Hello World!");

  screen.setTextColor(color+=0x3000);
  //Set text size to 3
  screen.setTextSize(3);
  screen.println("Hello World!");

  screen.setTextColor(color+=0x3000);
  //Set text size to 4
  screen.setTextSize(4);
  screen.println("Hello!");
  //Set text size to 5
  screen.setTextSize(5);
  screen.print("Hello!");
  delay(2000);

  //Set coordinate position x = 0, y = 0
  screen.setCursor(0, 0);
  //Fill color, RGB color with 565 structure
  screen.fillScreen(COLOR_RGB565_BLACK);
  screen.setTextSize(2);
  screen.setTextColor(color+=0x3000);
  screen.print("a = ");

  screen.setTextColor(color+=0x3000);
  int a = 1234;
  screen.println(a, 1);
  screen.setTextColor(color+=0x3000);
  screen.print(8675309, HEX);
  screen.println("this is HEX!");
  screen.println("");

  screen.setTextColor(color+=0x0F00);
  screen.println("running for: ");
  screen.setTextColor(color+=0x0F00);
  //Output time in millisecond
  screen.print(millis());
  screen.setTextColor(color+=0x0F00);
  screen.println("/1000 seconds.");

  char text[] = "Hi DFRobot!";
  screen.setTextColor(color+=0x0F00);
  screen.setTextWrap(true);
  screen.setTextSize(3);
  screen.println(text);
  //screen.setFonts((const gdl_Font_t *)SIMKAIFont18ptBitmaps);
  screen.println(text);
  delay(2000);
}
7.5.2 样例代码2 - gettreFont
**程序说明:**这是UI控件Demo——数字键盘。首先点击文本框出现光标后,点击数字,文本框内会有相应数字显示。键盘右下脚的"x",用于删除文本框中的内容。
#include "DFRobot_UI.h"
#include "Arduino.h"
#include "DFRobot_GDL.h"
#include "DFRobot_Touch.h"

/*ESP32 and ESP8266*/
#if defined(ESP32)
#define TFT_DC    D2
#define TFT_CS    D6
#define TFT_RST   D3
#define TFT_BL    D13
#define TOUCH_RST D10
#define TOUCH_INT D11
#endif

DFRobot_Touch_GT911_IPS touch(0X5D,TOUCH_RST,TOUCH_INT);
DFRobot_ST7365P_320x480_HW_SPI screen(/*dc=*/TFT_DC,/*cs=*/TFT_CS,/*rst=*/TFT_RST,/*bl=*/TFT_BL);

DFRobot_UI ui(&screen, &touch);

void setup()
{

  Serial.begin(9600);

  ui.begin();
  // Set the UI theme, there are two themes to choose from: CLASSIC and MODERN.
  ui.setTheme(DFRobot_UI::CLASSIC);

   //Create a numeric keypad
  DFRobot_UI::sObject_t &kp = ui.creatKeyPad();
  ui.draw(&kp);
}

void loop()
{
  // refresh
  ui.refresh();
}
7.5.3 样例代码3 - UI_gesture
**程序说明:**这是一个读取手势示例,在手势区域进行操作:单击、双击、长按、上滑、下滑、左滑、右滑。
#include "DFRobot_UI.h"
#include "Arduino.h"
#include "DFRobot_GDL.h"
#include "DFRobot_Touch.h"
/*ESP32 and ESP8266*/
#if defined(ESP32)
#define TFT_DC    D2
#define TFT_CS    D6
#define TFT_RST   D3
#define TFT_BL    D13
#define TOUCH_RST D10
#define TOUCH_INT D11
#endif

DFRobot_Touch_GT911_IPS touch(0X5D,TOUCH_RST,TOUCH_INT);
DFRobot_ST7365P_320x480_HW_SPI screen(/*dc=*/TFT_DC,/*cs=*/TFT_CS,/*rst=*/TFT_RST,/*bl=*/TFT_BL);

DFRobot_UI ui(&screen, &touch);

void setup()
{
  Serial.begin(9600);
  ui.begin();
  // Set the UI theme, there are two themes to choose from: CLASSIC and MODERN.
  ui.setTheme(DFRobot_UI::MODERN);

  //Create a text box control
  DFRobot_UI::sTextBox_t &tb = ui.creatText();
  //Create a text box control on the screen and draw the text box according to the customized or initialized parameters
  ui.draw(&tb);
  /**
   * @brief Set the touch gesture recognition area
   */
  ui.setGestureArea(/*x=*/screen.width()/2-75,/*y=*/200,/*width=*/150,/*height=*/200);
  while(true){
     //refresh
    ui.refresh();
    // getGestures(): Get gesture
    switch(ui.getGestures()){
      //setText:let the text box display a string
      case ui.SUPGLIDE : tb.setText("upwards slide"); break;
      case ui.SDOWNGLIDE : tb.setText("down slide"); break;
      case ui.SLEFTGLIDE : tb.setText("left slide"); break;
      case ui.SRIGHTGLIDE : tb.setText("right slide"); break;
      case ui.DLONGPRESSED : tb.setText("long press"); break;
      case ui.SCLICK : tb.setText("click"); break;
      case ui.DDOUBLECLICK : tb.setText("double click"); break;
      default  :  break;
      }
  }
}

void loop()
{

}
8. 兼容性测试
| MCU | 测试通过 | 测试失败 | 未测试 | 特别关注 |
|---|---|---|---|---|
| FireBeetle-ESP32 | √ | |||
| FireBeetle-ESP8266 | √ | |||
| Arduino Uno | √ | |||
| Leonardo | √ | |||
| Mega2560 | √ | |||
| Arduino M0 | √ |
9. 资料下载
10. 更多
更多问题及有趣的应用,可以 访问论坛 进行查阅或发帖!
